Tuesday, October 30, 2012

Tuesday's Tips and Techniques for Watercolor Painting


A Clean Brush is a Happy Brush

Even watercolor painting brushes need a good cleaning every now and then.

I like to use The Master's Brush Cleaner and Preserver.  They're slogan is "Keeps Brushes Like New."

It's a nice mild soap for cleaning your brushes.

If you need a helpful how to or step by step, check out my old Tuesday's Tip post from 2009:

http://ritasquier.blogspot.com/2009/07/tuesdays-tips-and-techniques-for_21.htmls

Tuesday, October 23, 2012

Tuesday's Tips and Techniques for Watercolor Painting


Crossing Planes

Adding an object that crosses from one plane over top of another will add depth to your painting.  

The tall grasses crossover the pond, this helps to add depth.
The tree on the left, crosses over the middle ground and background adding even more depth and interest to the painting.

This is a simple trick to add depth to your watercolor painting.

Plus the tree relates to last week's tip, its branches extend beyond the top and side of the painting.

Monday, October 22, 2012

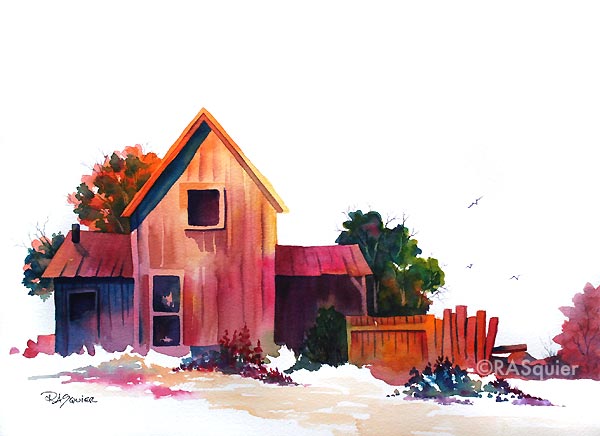
Colorful Color

The Little House 
by Artist Rita Squier 

Original Watercolor Painting
Size: 11x15"

Saunders Waterford 140 lb. Watercolor Paper
MaimeriBlu Watercolor Paint 

Last week's class project.  And what a fun and colorful project it was! 

Tuesday, October 16, 2012

Tuesday's Tips and Techniques for Watercolor Painting


Edge Stopping

Whatever object you're painting ... don't stop just before you get to the edge of the painting.

Lines, objects, tree limbs can be painted right off the edge of the painting.

The sad tree on the right has been painted with limbs that stop well before getting to the edge of the painting.

The tree on the left has limbs that extend off the top and side of the paper.  This is a happy tree, a more interesting tree.

This technique can be applied to all sorts of objects.  It's okay to paint beyond the edge.

Monday, October 15, 2012

Fall for Color


Autumn Color
by Artist Rita Squier

Original Watercolor Painting
Size: 11x15

Painted on Saunders Waterford 140 lb., cold pressed, archival, 100% cotton rag, acid free watercolor paper with MaimeriBlu artist quality watercolor paint.

Saturday, October 13, 2012

My Latest Class


Pink Flamingo No. 1
by Artist Rita A. Squier

Original Watercolor Painting
Size: 11x15"

This was my class project for this past Wednesday's watercolor class. It was fun exercise in loosening up while painting.  Which isn't always so easy for some.

Tuesday, October 9, 2012

Tuesday's Tips and Techniques for Watercolor Painting


Today's Tip:
Paint your lightest light next to your darkest dark.

While painting this quick little watercolor study, this little tip kept running through my mind, so I thought I would share it with you today.

If your lightest light is next to your darkest dark, it will create a more dramatic effect on your center of interest.

With watercolor painting, the white of the paper is your white.  The dark rocks make the rushing white water pop in this little study.

Saturday, October 6, 2012

Saturday's Painting


October Birthday
by Artist Rita Squier

Original Watercolor Painting
Size: 7" x 10"
On 300 lb. Winsor Newton Watercolor Paper

Painted this afternoon.  I have not painted on 300 lb. paper in awhile, I do enjoy it.  I actually love it!  The ability to paint wet into wet for a longer period of time suits my style perfectly.

Those with October birthdays get to enjoy the splendor and beauty of Autumn's colorful display.

Friday, October 5, 2012

The Etsy Front Page

In the wee hours of the early morning, my Squier Etsy Shop made it to the front page of the Etsy.com website and by early afternoon our featured item has sold.  Yay!

In his spare time, my husband Michael makes business card holders and pen holders out of black walnut with vintage tools.  We add them to the Desk Accessories section of our Squier Etsy Shop.

Thank you Etsy!

Tuesday, October 2, 2012

Tuesday's Tips and Techniques for Watercolor Painting

Lost and Found Edges 

To create drama in your watercolors you can add lost and found edges.  Also known as hard and soft edges.

The first blue shape consists of all hard edges or found edges.

The center green shape is a mix of found edges and lost edges.

The purple shape on the right was painted and all the edges were soften and have completely lost the hard edge.

To create a lost edge, I paint a swash a color, then use a clean brush, barely damped with clean water and work from the outside dry paper area, scrubbing toward the swash of color.  Lightly scrubbing the hard edge will help soften it up, you will loose the hard look and it will soften and fade away.

For some people it takes a bit of practice.  Use a scrap of watercolor paper or practice on a painting that did not turn out so well, practice right on the front or flip it over and use the back of the paper.  Add some lost and found edge shapes.  Who knows, maybe that painting you didn't think was so great will look fantastic with a few added shapes of lost and found edges.

Wednesday, September 26, 2012

Sneak Peek


Autumn Approaching 
by Artist Rita Squier

Original Watercolor Painting
Size:  11x15"

Here's a sneak peek at tonight's watercolor class painting project.

Dark and stormy sky with a colorful wet into wet fall tree line and a simple light, medium, dark varying foreground.

Tuesday, September 25, 2012

Tuesday's Tips and Techniques for Watercolor Painting


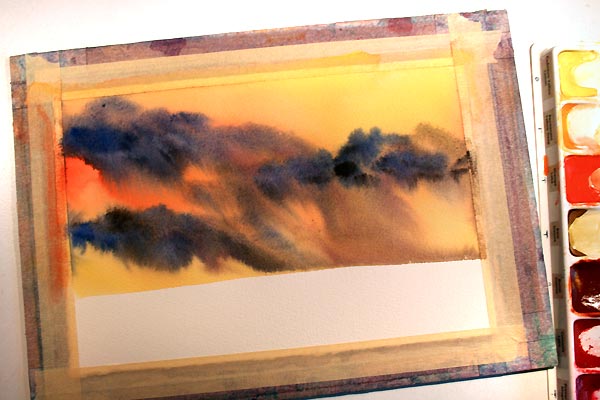
Tilt the Board 

Tilting wet into wet watercolor can create drama and cool effects in your paintings.

1. Apply strong colors wet into wet.
2. Tip your board at a steep angle, allowing the colors to flow and blend.  For this one I tipped the board almost vertical and angled it resting the right bottom corner on my table.  I used a paper towel to blot and paint & water that ran off the edge of the paper.
3.  Once your are satisfied with the movement of the paint.  Lay the painting flat to dry.

This is an excellent way to create a dramatic sky in your paintings.

Think driving rain storm.


Saturday, September 22, 2012

The Finished Product


Brushes and Tape
by Artist Rita A. Squier

Original Watercolor Painting
Size:  11x15"

This is the finished product from Tuesday's Tips.  I meant to post it first thing Wednesday morning and other stuff just got in the way.

I loved the project so much, I used it as Wednesday's Watercolor Class project for the first night.  Kind of a really hard test for my students  (Sorry about that.)  But in a way, it really does give me an idea of where people are at watercolor painting wise.

It's not perfect, but it's great practice in painting without drawing first, value changes light to dark, painting a quick still life and painting negative space.

Tuesday, September 18, 2012

Tuesday's Tips and Techniques for Watercolor Painting


My tip for today:

Step out of your comfort zone and paint what is right in front of you.

Try a style of painting you want to improve upon or have never tried before.  Challenge yourself.

Today's a blustery rainy day here.  I look out my window and I see maple leaves and small ornamental trees in the background.

Inside, right in front of me a still life waiting to be painted.  A simple roll of tape and a few watercolor paint brushes.  I personally do not set up a lot of still lifes.  But there it is, right in front of me.

A painting style I would like to do more of is negative shape painting.  I would normally give it a go with trees, leaves, flowers.  Today, I am attempting a negative space painting with a still life of common objects from my studio and I will do it all with one color making it an exercise in value tones.  I chose a blue with a wide range in values for the gloomy weather outside my window.

A quick shot of how my painting table looks right now at this very moment.  By now the paint and water have dried back and the painting is ready for step 2.

What's on your table?
What style or technique can you challenge yourself with?

Monday, September 17, 2012

Recipe Sharing


Easy Shortbread Cookies 

Sift together:

1/2 Cup Corn Starch
1/4 Cup Sugar
3/4 Cup Flour

Mix in:

1 Stick of Butter (1/2 Cup)

Mix by hand or with a mixer.

The dough will come together and form a smooth ball.

Scoop into 22 - 24 small round balls
Place on Ungreased Cookie Sheet
Flatten
Sprinkle with Sugar

Bake at 350˚F for about 12 minutes or until edges are barely golden.

Cool on cookie sheet.
Remove and enjoy!

The Details: 

If you want to flavor these cookies, you can add your favorite extract.  They're good with or without extract.  I've tried vanilla, lemon and almond at different times.  About a 1/4 to 1/2 teaspoon.  But it's really not necessary.

Most of the time, I mix the dough together by hand.  Literally by hand, no spoon.  It forms a smooth ball, the sides of the bowl and your fingers will be clean when ready for the next step.

I scoop out the dough and create little balls using a mini ice cream scooper thingie.  You can do heaping teaspoons.  Use your hands to form into little round balls.  Place on an ungreased cookie sheet.

Find something nifty to use to flatten them.
A glass, a cookie press gadget with a pretty pattern, a vintage meat tenderizer is what I chose for my periwinkle shortbreads shown below.
Dip the flattening tool into flour occasionally and then press the cookies flat.

Sprinkle with sugar.  I took regular sugar and added a few drops of food coloring and stirred to make the sugar periwinkle in color.  When my husband made a batch, he really flattened them and added raw sugar and flattened them again.  We've been making them like that since!  Makes you think you're getting a bigger cookie even though it's the same amount of dough since we use the scooper.  Plus the raw sugar is a pretty amber color and saves one step of coloring the sugar.

Depending on how thin or thick your cookies are the baking time will differ.
The thinner the cookie, the shorter the time.
The thinner the cookie, the crispier they are.
If you like the more crumbly shortbreads, don't flatten them too much.


Tuesday, September 11, 2012

Tuesday's Tips and Techniques for Watercolor Painting

A Good Cleaning

Sometimes to be inspired to paint in watercolor the studio just needs a good cleaning.  I sorted through some of the clutter in my studio and put most of it away where it belongs.

Stacked the watercolor palettes.
Put away the paper.
Scrubbed the art table clean.
Cleaned the paint splatter off the lamps, the tv.
The curtains, well the paint splatter adds character.
The hardwood floor is shiny clean.
The drop cloth is in the washer and on its way soon to the dryer.

If we don't turn to the left, the studio is ready and waiting for the watercolor painting to begin!

For me a clean and organized space is very important.

Saturday, September 8, 2012

Saturday Morning Creature

This giant creature was hanging onto the inside of the screen door as I was trying to take the puppy outside this morning.

I held the door open and he crawled up to the outside.  Then he stopped with one leg still in the door.  I propped my flip flop in the screen door so he would not get crushed.  I yanked the puppy back into the house, close the main door and ran upstairs for my camera.  I had to take a picture of this giant bug, I'd never seen a bug so big and seeing it for the very first time at eye level inches from me was rather startling and word producing.  A long slew of words  "Holy moly .... phew thank goodness he didn't jump on me!"  No potty mouth words.

As I took a bunch of pictures, he very slowly crawled up higher.  I was able to get my flip flop back and take the puppy for a walk.

I posted my picture on twitter and almost instantaneously found out I have a praying mantis crawling on the side of my house.  Apparently he is good luck.  I need all the luck I can get right now!  It was suggested I transfer him to my garden.  Yeah right!  He can find his own way there, I ain't touching it.

I did a little research on the internet and got a bit creeped out with the facts and some of the folk lore.  I'll ignore the bad stuff like men going blind.  I will hold onto the positive.  All is good now, I have luck on my side!


Friday, September 7, 2012

New Etsy Activity Feed


Here's a peek at my Etsy Activity Feed.

I love the new layout, the larger photos.

Etsy shop owners take amazing photos of their products.

The single photos are of items someone I'm following has favorited.

The four up photos are either a Treasury I'm in, a Treasury someone in my feed has created or favorited.

If you mouse over the the block(s) of photos info pops up next to the mini avatar to let you know more about that block, whether the item was favorited or a treasury was created.

Friday, August 10, 2012

Yay! Etsy Front Page


My beads made the front page of Etsy.com this evening!

A pair of 18mm Foggy Blue Torch Fired Enamel Beads in the loopy style.

It's so exciting to see my items make it to the front page of Etsy.  The last time an item from my shop made it was November 2011.

Oh so Happy!!

Now someone needs to purchase them!

https://www.etsy.com/listing/85412629

Thursday, August 9, 2012

Obtuse Study


Obtuse Study No. 5
by Artist Rita Squier

Original Watercolor Painting
Size:  11.25" x 9"

An experiment with paint, color and water on paper.


This watercolor and more are available for sale in my Squier Etsy Shop.

Monday, July 30, 2012

Obtuse Study


Obtuse Study No. 4
by Artist Rita Squier

Original Watercolor Painting
Size:  11.25" x 9"

An experiment with paint, color and water on paper.


This watercolor and more are available for sale in my Squier Etsy Shop:  http://squier.etsy.com

LinkWithin

Blog Widget by LinkWithin