Sunday, July 24, 2011

Etsy Front Page


My Bakers Dozen Torch Fired Enamel Beads made it to the Etsy Front Page on Sunday, July 24th at around 1 pm eastern time!

The Bakers Dozen set did not sell, but a few other sets of beads have sold, which does make me happy.

Check out more of my beads for sale in the Boho Chic Beads section of my Squier Etsy Shop.

Tuesday, July 19, 2011

Tuesday's Tips and Techniques for Watercolor Painting


The Fan Brush

Along the same lines as last week's post. The fan brush is yet another brush I purchased and rarely use. I haven't used it in years.

A fan brush is great for creating clumps of grass in one swoop.

For me, I find it easy enough to fan apart the bristles of a round brush or even a flat brush wet with sticky watercolor paints to create a similar effect, the clumps of grass blades.

Let's turn the table ...

How do you use a fan brush in watercolor painting?

Monday, July 18, 2011

8x10 Print

Purple Passion Drops

Print Size: 8x10 inches
Paper Size: 10x12 inches

A fine art giclee print of my original watercolor paintings from my popular Dew Drop Series.

My new prints are professionally printed on somerset velvet paper with epson ultrachrome archival inks.

It is hard to tell it from the original!

Tuesday, July 12, 2011

Tuesday's Tips and Techniques for Watercolor Painting


Second Chance to the New Brush

My favorite brushes are all made by Winsor &Newton.

My two most favorite flat brushes are the 3/4 inch One Stroke and the 1 1/2 inch Wash Brush with the short house painter style handle.

I do plan on giving the 1 1/2 inch Series 680 red handled brush another go this summer. I have recommended it to my students as a lesser expensive alternative to the slightly pricier wash brush. As you may be able to tell by the photo, I haven't used the red brush all too much. The bristles are still practically white.

I do have my favorite standby brushes, but now is the time to set aside the old favorites and perhaps give the newer ones a chance.

I bet you are like me, you have a few brushes you've purchased but do not use all too much. You keep reaching for the old faithfuls. You bought new brushes, maybe you have never used them. Perhaps there's a special technique or flick of the wrist the new brush may perform better or differently than the old brush. You won't know if you don't give it a go.

Let's pull them out and get those new brushes wet and sticky with paint!

Sunday, July 10, 2011

Long Awaited Product


You've chanted, "We want prints!" over and over.

The long awaited product is here! Now available in my Squier Etsy Shop is a special set of prints from my Dew Drop Series.

This time around, I'm keeping all the originals for myself and making the prints available to you for purchase.

Currently there are five different images available.

Print Size: 8x10 inches
Paper Size: 10x12 inches

Mix and match to your heart's delight!
They will look awesome matted and framed and grouped together.

Tuesday, July 5, 2011

Tuesday's Tips and Techniques for Watercolor Painting

The Pitt Pen

For my pen and ink watercolors, I always use a Faber Castell's Pitt Artist Pen. It is an india ink pen which is also waterproof.

Waterproof is important when drawing with ink and then painting in watercolor over the top. If your ink is not waterproof when dry it will bleed and look messy.

The Pitt Pens can be purchased as a set or purchased individually. They also come in different sized pen nibs:
S - Super Fine
F - Fine
M - Medium
B - Brush Tip

Sunday, July 3, 2011

Etsy Front Page at Midnight


Foggy Blue Too

My torch fired beads were featured on the Etsy front page at midnight on July 3rd in this awesome treasury.

The beads sold on Friday, July 8th.

Double yay!

Saturday, July 2, 2011

Thai Watermelon Carving


Watermelon Rose Baskets

Every summer picnic or party should have a nicely carved watermelon fruit basket.

This is the start of one I carved for my nieces graduation party last weekend. I ended up carving two that were pretty much the same. I forgot to take pictures of both and pictures of the finished basket. The fruit salad was delicious!

Time to head to the grocery store and carve one for the Fourth of July.

Yes, I carved it myself!

Friday, July 1, 2011

Summer Holiday


Have a fun and colorful Fourth of July Weekend!

Tuesday, June 28, 2011

Tuesday's Tips and Techniques for Watercolor Painting

10 Steps to Mask and Pour
Mask out your main subject of your painting and pour on the background.

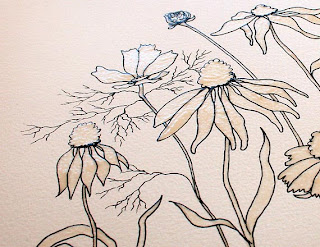
1. Apply masking fluid to the main subject of your painting. In this project, I masked all the flowers.
2. Choose your colors. It's best to start with 2 or 3 analogous colors, colors next to each other on the color wheel. Here I used green, blue and purple.
3. Using a small cup, mix a small amount of the paint with water to easy pouring consistency. Do this for each color.
4. Wet you entire page with clear water.
5. Pour on each color, one at a time. Tilt the board to blend.
6. Optional: Add kosher salt just as the shine goes off the paper.
7. Allow to dry completely.
8. Wipe away salt, if used.
9. Remove masking fluid with a rubber cement pick up.
10. Paint your main subject.

Monday, June 27, 2011

Personalize Printing Source


Today's design project was revamping Squier Design's Click Print website. An awesome little site where you can go to order Labels, Mailing Labels, Rubber Stamps, Business Cards, Post-It Notes and more.

Design your own layout using the templates online or upload a completed design. Fun and easy to use!

Plus excellent prices!

Friday, June 24, 2011

Boho Chic Beads


Torch fired beads, each with unique color. I enamel each bead one at a time, by hand using a torch. Each metal bead is heated until glowing orange at about 1500 degrees, dipped into powdered glass enamel and heated again. This process is repeated several times using both opaque and transparent colors until the desired effect is achieved. The reaction of the metal beads and enamel in the torch, each bead is somewhat unique.

Can't you see yourself creating your own fabulous jewelry with these bohemian beads?

These beads and more can be found in my Squier Etsy Shop: http://squier.etsy.com

Tuesday, June 21, 2011

Tuesday's Tips and Techniques for Watercolor Painting


Peeling Tape

When peeling the tape off your watercolor painting, peel at an angle away from the painting.

By doing this, you lesson the chance of tearing off a layer of paper with part of the painting that goes with it.

Once you remove the tape from the edges it really brings the finished painting to life. No more tape, no more messy edges, no more messy board to which the painting is mounted. That little white paper edge virtually frames the piece for the first time.

Saturday, June 18, 2011

Yay! Etsy FP!


Happy Birthday Etsy!

Just found out my Squier Etsy Shop made the front page of Etsy.com with my husband's handmade Cigar Box Guitar No. 29 La Gloria Cubana in a fantastic Happy Birthday Etsy Treasury. It can be played as either an acoustic guitar or plugged into an amp and played as an electric guitar.

Pair it up with our portable battery operated cigar box amp and rock out by the camp fire!

Chocolate Roses


What I did today ...

I baked a half dozen chocolate rose cakes and 11 cupcakes.

Then I poured a dark cocoa glaze over the top and topped them all off with red sprinkles. Love the sprinkles!

I baked them for Father's Day, but I think we're gonna have to test one tonight. Make sure it's good. :)

Tuesday, June 14, 2011

Tuesday's Tips and Techniques for Watercolor Painting


So you've tried landscapes, seascapes, still lifes, florals and abstracts, what's next?

Portraits!

Don't be afraid to give portrait painting a try in watercolor.

A few little tips and you'll be on your way.

Use transparent colors. You can create endless skin tones with a warm red, a cool red, a warm yellow and a cool yellow. Burnt sienna is an excellent choice for skin tones that are warmer and darker. Okay, burnt sienna is not a transparent color, it's sedimentary and kinda semi-transparent, but it's still perfect.

Use LOTS of water. Whether you're mixing up your colors with red and yellow or using straight burnt sienna, lots of water is key.

Layer up the colors to achieve shape, form, texture, depth.

Use hard and soft edges. You will need to define shapes and shadows with lost and found edges. To define the jaw and the ear, start by painting a hard edge under the jaw and behind the ear and then blend away the top edge so it fades upwards. This will also give shape to the head.

Start by keeping it simple and work from a photograph. Choose a photograph where the person's eyes are closed or looking down or maybe they're looking away. A profile. Eyes are tough. Choose your subject matter wisely. If you think you can't paint a portrait you can if you choose a simpler subject. A toddler, a baby, a bald headed person. Don't laugh. Eyes can be tough and so can hair. So don't let that stop you from trying to paint a portrait.

Study the photo. Look for shapes and textures. Simplify. Don't think of a nose as a nose, look for geometric shapes, organic shapes. A nostril can be a quarter of an oval with a hard edge at the top and a soft faded edge to the bottom.

Take your time. You can do it.

Monday, June 13, 2011

Prints or No Prints


I've been trying to decide do I make prints or just keep making originals. I'd love to turn some of my dew drops into prints. I've got a bunch of favorites from my Painting A Day Challenge that would make great miniature prints. ACEO sized.

But I've also been toying with the idea of starting a few new larger dew drop paintings.

What do you think? Leave a comment and let me know. Thank you!

Saturday, June 11, 2011

One Single Bead


One of the 101 beads.

Love it!

Friday, June 10, 2011

March of the Bead Groups


I have been busy this afternoon organizing, sorting and photographing my beads.

This week I have created 101 torch fired beads. I am doing a test to see how many beads I can create with one bottle of map gas. So far, 101 and the bottle is not empty yet.

Tuesday, June 7, 2011

Tuesday's Tips and Techniques for Watercolor Painting


Cool Effects with Waxed Paper
Enjoy creating abstracts? Want to try your hand at an abstract watercolor but don't know where to start? Grab a roll of waxed paper, tear off a few strips. Trim it into whatever shapes you feel like creating.

Start by creating a wet into wet watercolor background. While the paint is still wet, lay down pieces of waxed paper. Allow to dry. Peel off the waxed paper to reveal the cool texture left behind.

Use this as a base for your abstract painting. I added a few circles and a rectangle using lost and found edges. Experiment and have fun with it!

Use your imagination ... I'd love to see how your experiment turns out.

Thursday, June 2, 2011

More for My Dew Drop Series

Two Raindrops
by Artist Rita Squier

Original Watercolor Painting
Size 2.5 x 3.5 inches

Miniature Art
ACEO - Art Card

I love the dew drop series!

SOLD :)

LinkWithin

Blog Widget by LinkWithin