Tuesday, May 3, 2011

Tuesday's Tips and Techniques for Watercolor Painting


The Wash Brush
My all time favorite and coveted watercolor wash brush is the Winsor & Newton Series 965 Wash Brush - 1 1/2". The bristles are a blend of natural hair and synthetic fibers. It holds a lush amount of paint and water. Perfect for creating gorgeous skies!

Glides across the watercolor paper, twisting and turning helping me to create wonderful paintings. I can and have done entire watercolors with this brush. I have three!

It's simply fantastic!

Monday, May 2, 2011

Book Sale Finds

This past Friday, I went to a book sale at a somewhat local library. I was very happy to find six books to add to my stack of not yet read books. I only have two maybe three left from book sales I went to last fall. Somehow, I did not get through my entire stack of winter books.

Saturday, on my way to check on my in-laws' new dog which will be having puppies any day now, we stopped at a tag sale. There I found two fun Sophie Kinsella books.

Eight books for a total of $7 not bad at all. They're all in really good shape too. They look to have been read only once.

I had three books on my hope to find list, but I did not find them at the book sale. I definitely have a few books to keep me busy until I find them.

Tuesday, April 26, 2011

Tuesday's Tips and Techniques for Watercolor Painting


Using Masking Fluid

Things you will need:
- Masking Fluid
- Old Brush
- Bar of Soap
- Small Water Container
- Stir Stick
- Damp Paper Towel
- Watercolor Paper - maybe with a drawing on it

Upon opening my bottle of masking fluid, I stir it with the handle of a kid's paint brush, until it is smooth. If you shake the bottle, you have to wait a long time for the bubbles to settle. Stirring is better.

I have a brush I use only with masking fluid, I even put a little piece of tape on it to label it. You can use an old watercolor brush or an inexpensive one. Mine has nylon bristles.

I always dip the brush in a small separate water container. You don't want to contaminate your painting water with soap and masking fluid.

Dip the brush in the water, then swirl it across the top of a bar of soap. The soap is the key to keeping the masking fluid from sticking to the bristles. Use a damp paper towel to gently squeeze most of the soap off the brush.

Dip the brush into the masking fluid container and "paint" it onto your watercolor paper in the areas where you would like to save the white of the paper.

Rinse your brush and re-soap it several times when using masking fluid to cover small, medium to large areas.

Rinse and re-soap your brush when you're done.

When you are done using the masking fluid, use a damp paper towel to wipe the top of the bottle and the inside of the lid. Make sure it is nice and clean. Then screw the top back on. This will extend the life of your masking fluid.

Monday, April 25, 2011

Happy Easter


The easter bunny poured his paints all over my delicious pound cake. It turned out to be a big hit.

Hope you had a wonderful Easter.

Wednesday, April 20, 2011

Weekend Baking


Homemade Honey Bread

I've been editing photos for upcoming posts and class projects and I came across this photo. On Sunday, I decided I wanted to bake a loaf of bread. I scoured my cookbooks, found recipes I have tried before and then decided I would make a recipe I have not yet tried. This proved to be a little bit of a challenge, my pantry is not well stocked at the moment. I found a recipe for honey wheat bread. I'm all out of whole wheat flour. I altered the recipe and used all unbleached flour.

It's fantastic!

Tuesday, April 19, 2011

Tuesday's Tips and Techniques for Watercolor Painting


Plastic Wrap as a Technique

Here's a creatively, fun way to create water in a watercolor painting.

Paint a wet juicy swash of turquoise or blue green in an area on your paper where you would like to simulate water. While the paint is still wet, lay a piece of plastic wrap over top of the wet paint. Pinch and pull the plastic around.

Where the plastic is pressed down against the paper, the color will be the darkest.

You must leave the plastic wrap on the paper until the paint is dry. Once you set it down, do not lift it off of the paper. Simply work the shapes until you are satisfied you have some interesting shapes. If you try to create horizontal crevices, it will look more like water. You're manipulating the plastic almost like finger painting.

Leave the plastic wrap in place until the paint is dry. When dry, remove the plastic wrap and you will be left with a unique texture resembling shimmering water.


Thursday, April 14, 2011

A Beginner Project

Tuesday's Sheep
Watercolor Painting
Size: 11 x 15 inches

A watercolor landscape we painted in the beginner class a few weeks ago. By learning a few basic techniques, you can create wonderful watercolor paintings.

Wednesday, April 13, 2011

Last Beginner Class


Tuesday's Barn
Watercolor Painting
Size: 11 x 15 inches

This was Tuesday Night's Beginner Class project. I tried to taylor the colors to those in the palettes of my beginners.

A watercolor project with a twist taken from "Watercolor Techniques" a workbook by Tony Couch.

I love using a variety of projects in my beginner & advanced classes. A few taken from workbooks and many I have developed on my own. This shows them they can learn outside of class with the help of step by step workbooks.

Tuesday, April 12, 2011

Tuesday's Tips and Techniques for Watercolor Painting

Color Pop

Scooter kitty helped me with this week's Tuesday's Tip. He decided the paint palette should not be on the table covering the water container. So he pushed it to the floor. Two colors popped out of the palette. The crashing palette scared him and he ran out of the room. Hopefully, he will not try to drink the water again. Luckily, that batch of water was clean and fresh. Note to sell, do not leave bowls of water on table overnight.

1. Dried color has popped out of the palette.
2. Use a wet brush to clean out the well.
3. Get the bottom of the dried paint chip nice and wet.
4. Press firmly back into place and allow to dry.

No need to worry or waste a good dried chip of watercolor paint!

Monday, April 11, 2011

Etsy Front Page Again!


This time my Speckled Eggs torch fired enamel beads made it to the front page of Etsy.com at 7 pm eastern ... so very exciting!

Find the beads right here:

Even more beads in the bead section of my

I need more mapp gas so I can create more beads!

Friday, April 8, 2011

Etsy Front Page Hurray!


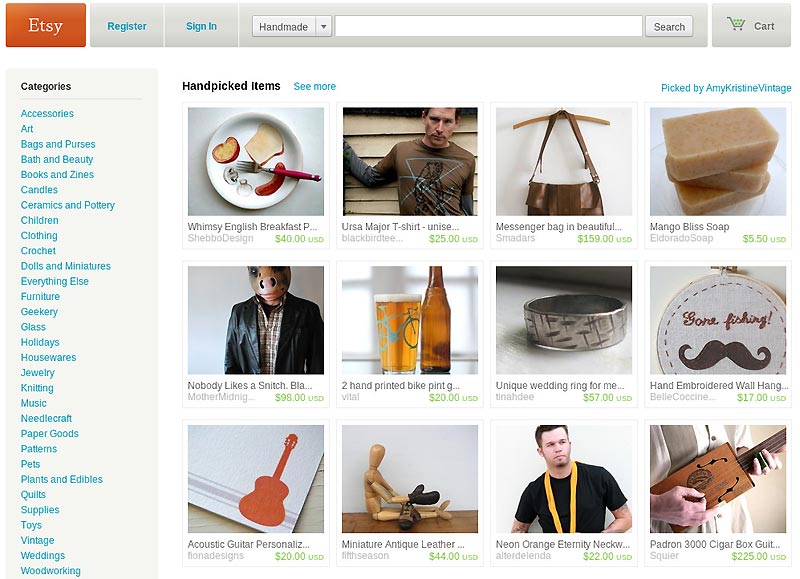
My Squier Etsy Shop made it to the front page of Etsy.com this morning at 5 am. So exciting! Here's a screenshot showing my husband's Padron 3000 Cigar Box Guitar.

This Padron 3000 CBG has a nice bright, almost banjo like sound.

You can find it for sale here:

Wednesday, April 6, 2011

Beginner Lily


Tuesday Nights Beginner Watercolor Class Project:
The Water Lily

Last night I taught my beginner watercolor students how to paint a water lily. We went for bright and colorful. A cheery little project with a fun plastic wrap technique for the water.

Simple. Colorful. Fun.

Tonight's advance class will be painting a barn.

Tuesday, April 5, 2011

Tuesday's Tips and Techniques for Watercolor Painting


Block vs Sheets

I prefer to buy my watercolor paper by the sheet. Actually packages of sheets 10, 50, 100 sheets to a package. I can then paint really large or trim the sheets down to the exact size I would like to use. It is very economical too.

But I do see the allure of blocks. Blocks of watercolor paper are excellent for travels and painting outdoors. The sheets are always the exact same size and ready to go.

If your watercolor painting style is rather wet, you are better off with sheets. Otherwise, I recommend slicing off one sheet from the block and mounting it on a board before painting.

Watercolor blocks usually come with around 20 sheet to a block when they're made up of 140 lb. paper. They are sealed around all four sides with a gum to keep water from getting to the other sheets. There is a small space usually at the top where there is no gum. That is where you slide in your palette knife and draw it all the way around the edges to remove the top sheet.

One thing I found with blocks is if you paint really wet, the sheet below also gets wet. After awhile, the gum either wears away or you get a little slit forming in the side and water seeps in. If the paper gets wet too many times, it begins to lose its sizing. If this happens, you'll notice an odd pattern around the edges of your painting. A weird texture appears in what should be a flat wash.

Blocks do have their benefits. Perfect for those who don't paint too wet. Great for traveling and painting outdoors. Another pro to the block, no watermarks or embossings.

Monday, April 4, 2011

Wild Tiger Beads


Spent the day doing tax prep work. I'm done and ready to hand over my paperwork to my accountant.

Just wanted to share an awesome set of beads created by my husband Michael.

This is what happens when you share your new hobby with your spouse, he becomes really good at it too.

Love the orange, grey and tan combo on this set of beads.

This set and more are available in our Squier Etsy Shop.

Tuesday, March 29, 2011

Tuesday's Tips and Techniques for Watercolor Painting


Tuesday’s Tips & Techniques is Back!


I have gone through so many tips already having done this little column for over two years. I have received lots of compliments and lots of feedback from those who wish that I continue my Tuesday’s Tips. I think I chose to stop doing it because I no longer have my faithful furry friend Chloe sitting next to my desk as I type or under my art table as I created the little samples for photos. I’m thinking she’d probably nudge me now to keep it going. You’re not gonna believe this but as I’m typing this my little pal Scooter has hopped his paws up on me and is meowing. It must be a sign.


I love coming up with a new tip each week. Although now I have a feeling I may be repeating a few but hopefully giving them a new sparkle or perhaps you missed it the first time around. Refreshers and reminders are always good too. So here goes ...


Watercolor Paper


One of the important key features to a watercolor painting is the watercolor paper. You want to use quality paper that will stand the test of time. If you’re just learning to paint, many of the techniques are so much easier to learn if you’re using decent paper. The colors of the pigments and how they react with each other and react with the amount of water you’re using are also effected by the quality of paper you are using. You don’t want paper that will buckle and ripple if you use a technique that calls for small amounts of water or excessive amounts of water. You don’t want thin flimsy paper. Watercolor is a challenging medium to learn and you want paper that will stand up to the challenge.


I recommend using 140 lb., 100% cotton, cold pressed, acid free, neutral pH, watercolor paper. The brand choice is up to you.


My favorite paper is still Saunders Waterford. It’s manufactured by St. Cuthberts Mill in Somerset England. At the site of the earliest paper making mills in England. The quality is excellent and consistent. It is a mouldmade paper of 100% cotton and it is sized internally and on the surface with gelatin. It is acid free. Two edges of a full sheet are regular deckled edges. I’m guessing they make them in super long lengths and the other two edges are a torn edge. Of course it would be long in order to create the rolls. It is available as sheets, rolls and blocks. On the sheets, one corner has a watermark and the opposite corner has an embossed trademark. One of the things I love about this brand of paper is the watermarks and embossings are not huge. This paper is excellent, it stands up to a lot of abuse, aggressive painting techniques, lifting, scrubbing. It is an excellent choice for watercolor paper.


And yes, Scooter is still here by my side. He’s a cat who sometimes acts like a dog.

Friday, March 25, 2011

Cigar Box Guitars


Country Boy Guitars

Handmade by Michael Squier

These CBGs are amazing musical instruments. Michael hand carves each neck, which is made from a fallen black walnut tree. The fretless necks have burned in markers, which produces a very unique sound. His guitars have open tuning and can be played with a slide or by fretting with your fingers.

Each guitar has its very own unique sound. The different cigar boxes give them a slightly different sound. They can be played as an acoustic or electric guitar. A piezo pick up is mounted inside the bridge, you can hook it up to your own amplifier.

To hear a sound clip of one of Michael's CBGs being played, click here:

Michael creates each of his Country Boy Guitar Cigar Box Guitars using vintage tools. They are definitely an awesome conversation piece, however, they are made to be played!

You can find several of Michael's ready made cigar box guitars in the Cigar Box Guitar section of our Squier Etsy Shop. You can also find a custom order guitar there as well, you can choose the cigar box you would like and choose whether you want it left or right handed.

Folk, rock, delta blues ... you can play anything on these wonderful instruments.

Saturday, March 19, 2011

Busy Beader


I've been busy playing with my torch and creating lots of gorgeous beads. Only thing is, I'm not sure what to do with all of them. So I decided I would add sets of beads to a special section in my Squier Etsy Shop.

Others too can create wonderful and inspirational pieces of art jewelry from my beads.

Wednesday, March 16, 2011

Wednesday Watercolor Class


Seascape
by Artist Rita Squier
Size: 11 x 15 inches

This Spring's Wednesday Night Watercolor Painting Classes start tonight. This is the step by step painting I will be teaching my students to paint.

Friday, March 11, 2011

Smile


Heading to a woman's club meeting today, I was asked to bring a cake. They are collecting donations for Operation Smile and holding an Arts & Crafts Contest for club women and the local high school students. I have judged this competition in the past, there's a lot of local talented kids out there!

Like my smile cake? It's a Lazy Daisy Cake from the Fannie Farmer Cookbook. It's delicious! And I hope it's a big hit today.

Thursday, February 24, 2011

First Bracelet


Today while doggy-sitting for Chloe's two best friends Dutch and Ashley, I created my first bracelet with my torch fired beads. It was great having big furry friends in the house for the day. Recently we found out Ashley too has cancer. She has leukemia, different from Chloe, but still cancer. She's just started her chemo treatments this week.

The hardest part about making the bracelet is choosing which beads to use. I chose a few special beads, one from the very first day we torch fired beads, which was Christmas morning. I love santa, thank you for the kit! A bead that was made on my birthday and took forever to find driving all over creation to find an open bead store. Don't think I'll be going back to the stores, I found great sources online. A few beads my husband made. I raided his stash! He won't mind since I am keeping the bracelet for myself. Two beads Michael made for me on Valentine's Day. Plus a couple of beads I torched myself. I used the twisty copper links I created a few weeks ago and head pins my husband made. I fabricated my own clasp too.

I now have a funky, dangly bracelet.
I love it!

Wednesday, February 16, 2011

Wishes for Spring


Spring Paisley

One of my torch fired enamel beads.

Just fall in love with the simplicity of a single large bead on a slim leather cord.

LinkWithin

Blog Widget by LinkWithin